|
6. The 'EMMENU' menu |
6.0 Getting started |
EMMENU provides command groups for camera- and microscope controls, image display and analysis, definition and execution of TCL-NT user macros and other things.
Note: In this help we will describe all possibilities provided by EMMENU, but please keep in mind, that in your specific software distribution not all of the described features might be available.
Note: This help only describes what you can do with EMMENU but not how it works internally or the theory behind it.
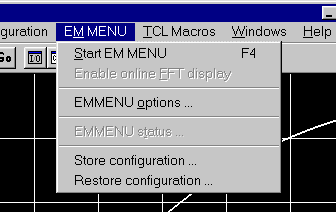 |
The EMMENU is started either by selecting Start EM MENU in the TCL menu EMMENU, by pressing the function key F4 while the TCL window is active or
by clicking on the button with the microscope in TCL's toolbar.
EMMENU will now start initializing. This procedure can take several seconds. You can monitor the current action by watching the status bar of the window. When the initializations
are finished the main dialog will be opened.
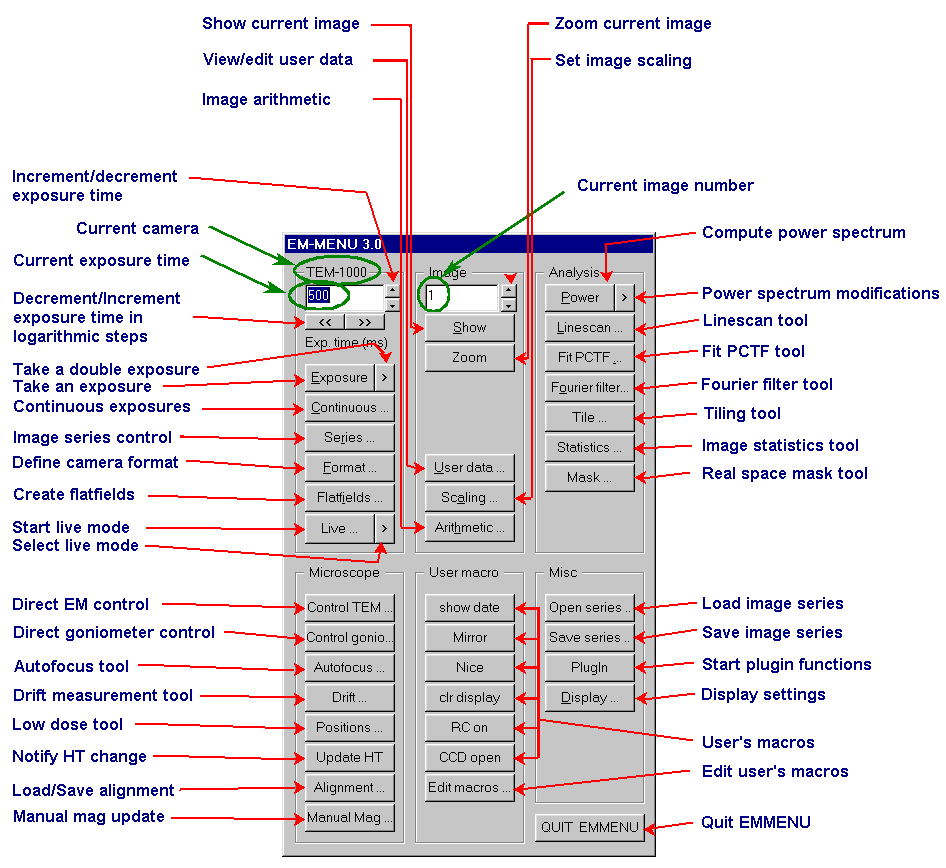 |
The following table shows a little overview about the six commandgroups of the 'EMMENU' submenu:
| Section | Comments |
|---|---|
| CAMERA | Commands for controlling the camera, the acquisition and display of a single image or image series and the creation of flatfields |
| IMAGE | Single images can be displayed and the image user data can be looked up and changed |
| ANALYSIS | Several image analysis commands like linescan or fourier filters |
| MICROSOPE | Commands for controlling the microscope and the corresponding parameters |
| USER MACROS | Edit and activate user created TCL macros |
| OTHERS | Store/load images on/from harddisk, change display parameters and configurations with the buttons of this section |
There is a special program flow if EMMENU is configurated in such a way that there is no remote control performed. Before the mainpage of the EMMENU appears, the 'Manual Mag' dialog will open.
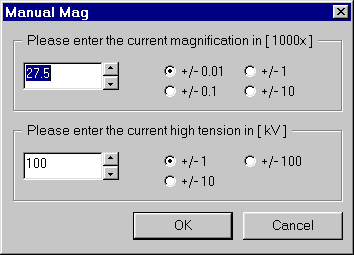 |
In this dialog you have to enter both the magnification and the high tension you will use to acquire images.
Note: Every time you change either magnification or high tension of the TEM you have to adapt those values.
See Manual Mag ...
for more informations.
Note: Another effect if no remote control is configured is, that most of the buttons in the section microscope are disabled, since they require
remote control communication with the TEM.
The online FFT works together with the zoom feature. A FFT is calcualated using a 128x128 square around the magnifying glass. Note: Since the FFT is calculated from the displayed greyvalues it is not suitable for image analysis; it's just for getting a quick overview. The origin of the display area for the FFT can be changed in the 'Change Configuration' submenu.
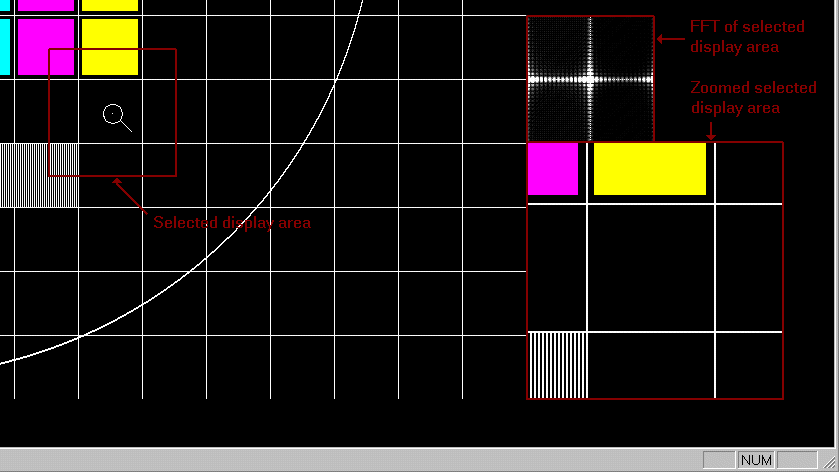 |
Button: you can also activate/deactivate the online FFT with ![]() in the toolbar.
in the toolbar.
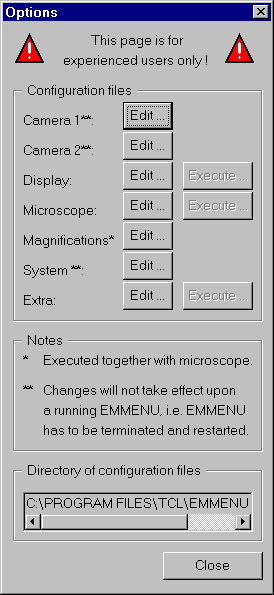 |
Note: this dialog is for experienced users only!
Edit, change and execute the configuration file(s) for the single components of your system.
Camera1 contains the information for the first ( and normally only ) CCD camera
Camera2 contains the information for the second CCD camera ( if available )
Display contains the information about the display settings
Microscope contains TEM specific data
Magnification contains TEM specific data like magnification lists for different high tensions
System contains system dependent information
Extra contains settings that are applied after all initializations ( empty by default )
If EMMENU is currently running, the buttons labeled Execute will be activated. A click on the corresponding Execute button will then activate the changes you did in the editor. It is not possible to activate the changes of the camera settings and the system settings during runtime of EMMENU. To activate those changes you have to restart EMMENU.
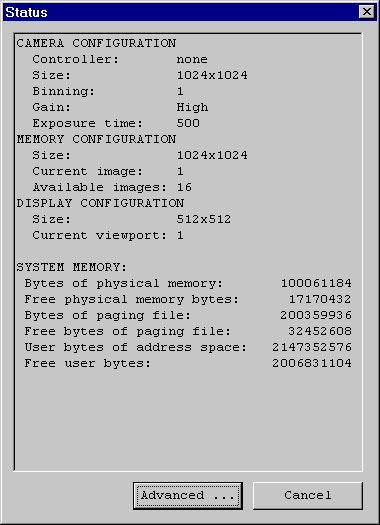 |
This dialog shows interesting information about the actual status of the camera, memory and display configuration.
Advanced users can receive more info by clicking on the [Advanced...] button.
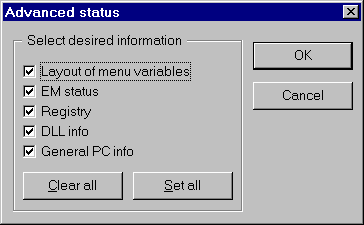
In the 'Advanced status' dialog you can select which of the 5 informations you want to receive. Check the corresponding
options you want to receive ( [Clear all] clears all check boxes whereas [Set all] marks them all ) and click on OK.
The file selector will open and you are asked to enter a filename. This file is filled with ASCII information, depending
on your selected options.
 |
The EMMENU uses several configuration files to adapt your system to your needs. Those configuration files include camera specific parameters,
microscope dependent parameters, etc. The configuration files are the heart of your EMMENU installation and need to be saved.
EMMENU copies the files to a floppy disk in drive A: into a folder of the format CoYYMMDD where YYMMDD is replaced by the last 2 digits of the year(YY),
the current month(MM) and the current day(DD). E.g. a backup started on the 3rd of november 2000 will result in a directory Co001103.
Since EMMENU tries to avoid any trouble with the file system(s), the configuration files are renamed to a 8-dot-3 compatible format. Therefore it is recommended
to store and restore the configuration files only with the 2 menu items Store configuration and Restore configuration, respectively.
Note: Store the configuration every time you change one of the configuration files and keep the floppy disk at a secure place.
Restore configuration is the correct way to restore configuration files from a floppy that have been stored using
Store configuration, since the file names of the configuration files on the
the floppy are changed to fulfil the 8-dot3 format.
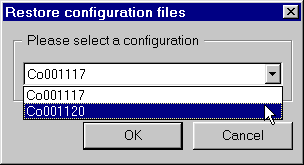
The floppy is checked and all the available configuration directories are shown in a list:
 |
Last update: