6.6 Command group OTHERS |
In the 'OTHERS' command group are submenus for loading and storing images, setting the display properties, querying status information and changing program options.
After clicking on ![]() the 'load image series' dialog opens:
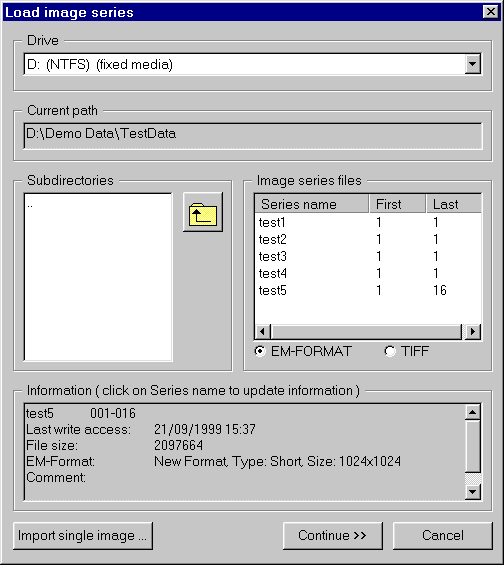
the 'load image series' dialog opens:
 |
A click on ![]() leads to the Import image dialog.
leads to the Import image dialog.
In the 'Drive' section of this page you can chose the harddisk drive (or partition) where the data are stored.
The 'Current path' section is just for information.
In the 'Subdirectories' section are the available subdirectories listet (the '..' and ![]() lead one level upwards). Changing the subdirectory will update the current path.
lead one level upwards). Changing the subdirectory will update the current path.
If there are stored EM image series within the actual subdirectory, they are listed in the 'Image series files' section.
The information given in this section is the name of the series, the numbers of the first and last image in this series.
With the radio buttons ![]() you can switch between image series stored in EM format and image series
stored in TIF® format. Note: Only TIFF files that contain uncompressed 8 or 16 bit greyvalue images and additionally contain the TemData tag
are supported by this TIFF reader. It is not possible to read e.g. 24 bit RGB images.
you can switch between image series stored in EM format and image series
stored in TIF® format. Note: Only TIFF files that contain uncompressed 8 or 16 bit greyvalue images and additionally contain the TemData tag
are supported by this TIFF reader. It is not possible to read e.g. 24 bit RGB images.
The last section in this page gives some information about the chosen EM image series.
With ![]() is the 'Load image series' page continued:
is the 'Load image series' page continued:
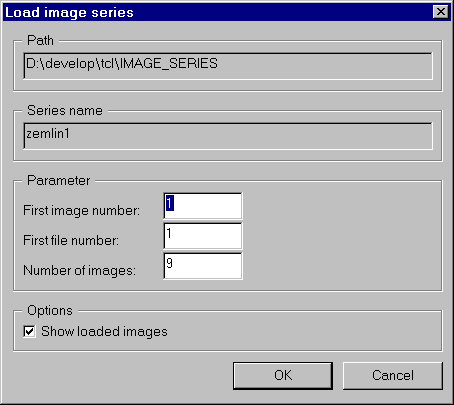 |
The upper two sections give information about the actual path where the EM image series is stored and which one is chosen.
In the 'Parameter' section you can enter the first image number where the first image within the series should be located in the system memory. This means that in memory are a specific number (depending on the chosen camera format) of 'images' reserved. These memory areas are referenced by 'image numbers'.
Example: after you have done one exposure you might compare this exposure with a stored image. Assuming the exposure is store in image number 1 you now load the older image to image number 2.
Because each image within an image series is stored in a single file, you may select the first file number to load. Then the number of images you can load must not be greater than the remaining number of files, i.e. there are 10 images stored within the files image_001.dat ... image_010.dat. If the first file number you enter is 7 then the number of images must not be greater than 4 (image_007.dat to image_010.dat).
Summary of section 'Parameter':
| First image number | The first image number in the system memory where to load the data |
| First file number | The first image number within an EM image series which contains the data (this is a file on disk) |
| Number of images | The number of images to load into memory |
If the check-box in the 'Options' section is marked then the images are displayed on the screen immediately after loading from disk, otherwise not.
Save image series:
After clicking on ![]() the 'save image series' dialog opens:
the 'save image series' dialog opens:
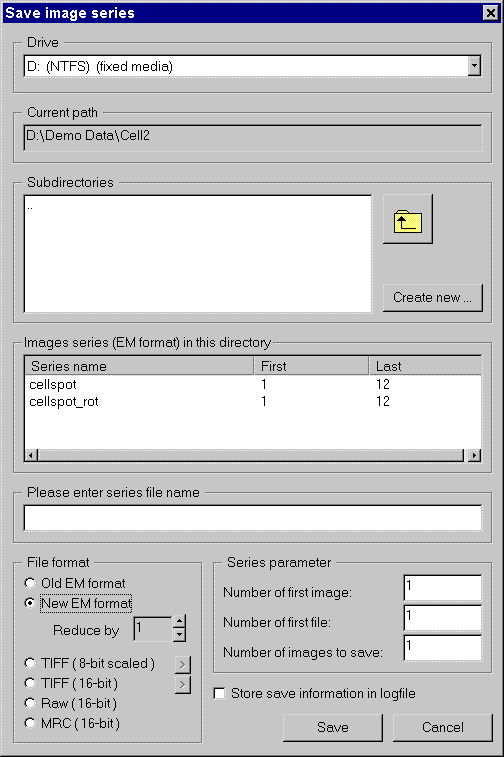 |
This page is very similar to the 'Load image series' page. The first three sections are nearly the same. Additionally you can create a new subdirectory below the current path.
The section 'Images series in this directory' shows a list of existing image series, from which you can chose. If you have clicked on an existing name, it will appear in the editfield. Create a new series name just by entering the new name in the editfield. Due to limitations in the TCL software the complete filename ( i.e. the path and the filename ) must not be longer than 79 characters. Note: the '\' charcter is internally expanded to '\\'.
In the section 'Series parameter' are three editfields, 'Number of first image', 'Number of first file' and 'Number of images to save', which have the same functionality as the corresponding editfields described above.
In the section 'File format' you can select the fileformat the images are stored:
The New EM format offers the possibility to reduce the image data before saving it to file. The reduction factor is a power of 2, i.e. 1 ( = no reduction ), 2, 4, 8, ... Note: Reduction means loss of data.
The TIFF (8-bit scaled) format offers a lot of options. A click on '>'  opens the 'TIFF (8bit) options' dialog:
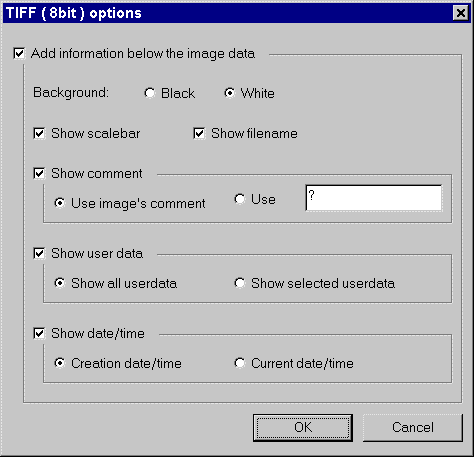 |
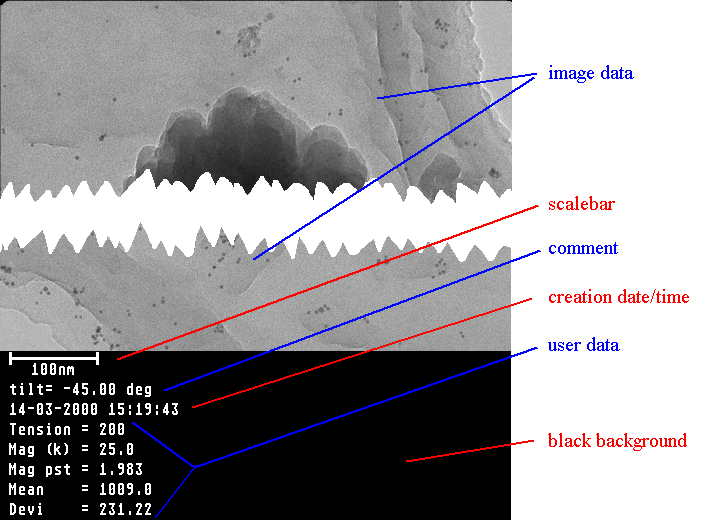
If 'Add information below the image data' is selected, the image is expanded in y size ( with the specified background ) and the specified image information is written into that info area and therefore saved together with the image data in one file. This has the advantage that the full image data is available ( and not destroyed by information like scalebar ), but the information is also available. If e.g. the scalebar is later required in the upper right corner of the image data, this is a simple operation by any graphics or dtp program.
Example: An Tiff (8-bit scaled) image with additional information ( background black, scalebar selected, image's comment selected, selected user data selected and creation date/time selected ) will look like this:
 |
The TIFF (16-bit scaled) format also offers options. A click on '>'  opens the 'TIFF (16bit) options' dialog:
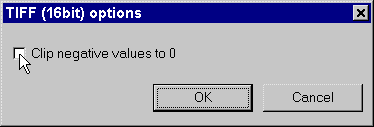 |
If the option Clip negative values to 0 is checked, then all pixel values less than 0 are set to 0 before saving the image data. This is to avoid any signed integer vs. unsigned integer mismatches.
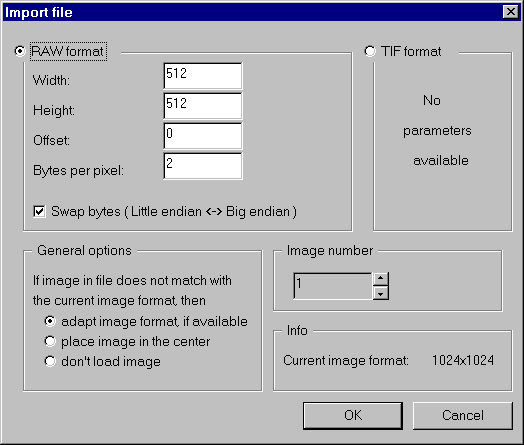 |
You can either import a raw image or a TIFF® image. If you import a raw image
you have to specify the width and the height of the image in units of pixels,
the offset of the image data from the beginning of the file in bytes and the
number of bytes per pixel. If the number of bytes per pixel is greater than 1,
the option 'Swap bytes' can be used, to swap between big endian format ( used by
e.g. Motorola CPUs ) and little endian format ( used e.g. by INTEL CPUs ). If
you want to import a TIFF image, all those parameters are available within the
file and there is no need to specify them.
Note: At moment only uncompressed 8 or 16 bit greyvalue TIFF files are supported.
In the section 'General options' you can specify how to react, if the size of the image in the file is not equal to the current image size. In the section 'Image number' you have to specify the image number of the destination image.
Note: TVIPS has expanded the TIFF format by a new tag holding all the necessary user data. Therefore TVIPS received a private tag by Adobe®. All images stored by EMMENU in TIFF format will contain that TemData tag. If you want to use that data in one of your programs you can receive a document describing this TemData tag from TVIPS.
If the imported image contains the TemData tag, the image is now available as any other loaded image.
If, on the other hand, the image contains no such TEMdata, the user data dialog (6.2.5.) will pop up and you have to enter the
appropriate values.
Note: The edit fields are filled with dummy values and the EMMENU will produce strange results if you do not enter the correct values, e.g. if you
use the scale bar in the image but the magnification is completely wrong, also
the scale bar will show be displayed in the wrong length.
If option Store save information in logfile a txt file is generated in the same folder as the images, where image names, acquisition times and the currently selected user data are listed.
With ![]() is the 'Display setup' dialog opened:
is the 'Display setup' dialog opened:
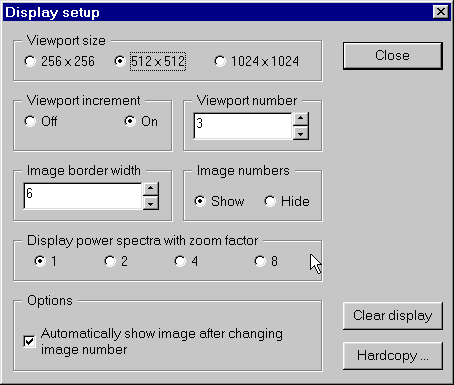 |
This submenu is divided into 6 sections:
The viewport size determines how the image is displayed.
Example: the viewport size is 512x512 pixels and the image size (determined by the current camera format) is 1024x1024 pixels then the displayed image is reduced by 2x2. The image data are not changed.
In the section 'Viewport increment' you control whether the viewport is incremented after displaying the image or if all output is sent to the same viewport.
In the section 'Viewport number' you determine the viewport for the next image.
In the section 'Border' you can select the width of the border (in camera pixels) that is applied to the image data.
In the section 'Image numbers' you can select whether you want that the image numbers are shown or not.
In the section 'Display power spectra with zoom factor' you can select the magnification factor for the power spectra.
In the section options you can enable/disable the option whether an image is automatically shown if the image number has been changed.
Note: All selections in this dialog are executed immediately. There is no 'Cancel' or 'Undo' available.
![]() clears the display:
clears the display:
![]() opens the 'Hardcopy' dialog:
opens the 'Hardcopy' dialog:
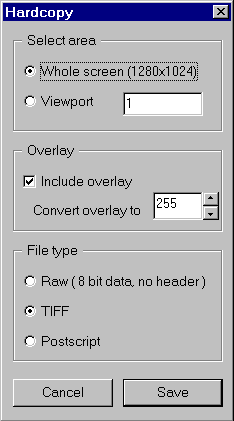 |
This dialog is divided into 3 sections:
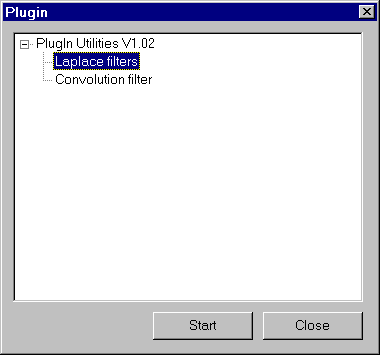 |
Pressing ![]() opens the PlugIn dialog. If the plugin directory ( see
chapter 5.1 to specify the plugin directory ) does not contain any valid plugin
DLL, the message 'Sorry, no plug-in modules found' will appear. If there are
plugin DLLs available they are listed in a tree structure. The branches show a
general description of the plugin, whereas the leaves show the available
functions. In the dialog above 'PlugIn Utilities V1.02' is the general
description and 'Laplace filters' and 'Convolution filter' are the available
functions. Activate one of the functions and click on
opens the PlugIn dialog. If the plugin directory ( see
chapter 5.1 to specify the plugin directory ) does not contain any valid plugin
DLL, the message 'Sorry, no plug-in modules found' will appear. If there are
plugin DLLs available they are listed in a tree structure. The branches show a
general description of the plugin, whereas the leaves show the available
functions. In the dialog above 'PlugIn Utilities V1.02' is the general
description and 'Laplace filters' and 'Convolution filter' are the available
functions. Activate one of the functions and click on ![]() or double-click a
function to start a function. The description of the plugins and their functionality is not part of this
document.
or double-click a
function to start a function. The description of the plugins and their functionality is not part of this
document.
Last update: